How to host a Flask app on Openshift
Note: This article may no longer be relevant as Red Hat has recently changed the openshift stack with docker and kubernetes.
Openshift free tier is an excellent way to host your python web app for staging or testing, and you can even host a low to medium traffic production site. Openshift provides several options (cartridges) for hosting including python, php, node.js, etc. but python being my favorite language and Flask being a minimalist and flexible framework, this combination is what I usually end up with.
Create an Openshift account
In case you haven’t already, head over to Openshift and sign up for a free tier. You will be able to host at most three apps for each account. Openshift apps are hosted on rhcloud.com domain and you’ll have to setup a subdomain first which will be part of your app url. For instance, if I register prahladyeri.rhcloud.com subdomain, I can create the following apps with that:
myflaskapp-prahladyeri.rhcloud.com
myphpapp-prahladyeri.rhcloud.com
blog-prahladyeri.rhcloud.com
Install the necessary tools
You will need the following:
- Git: Your app resides in a git repository, so you’ll need git installed on your machine to push changes. App is deployed automatically once you push.
- Python and Flask: Obviously, you are going to need them if you are building a Flask app.
- Openshift rhc tool: This
rubybased tool is optional, only use it if you don’t want to use their online portal for creating apps or you aren’t familiar with ssh. Personally, I didn’t want to installrubyon my machine just for this one purpose.
Pull the remote repo
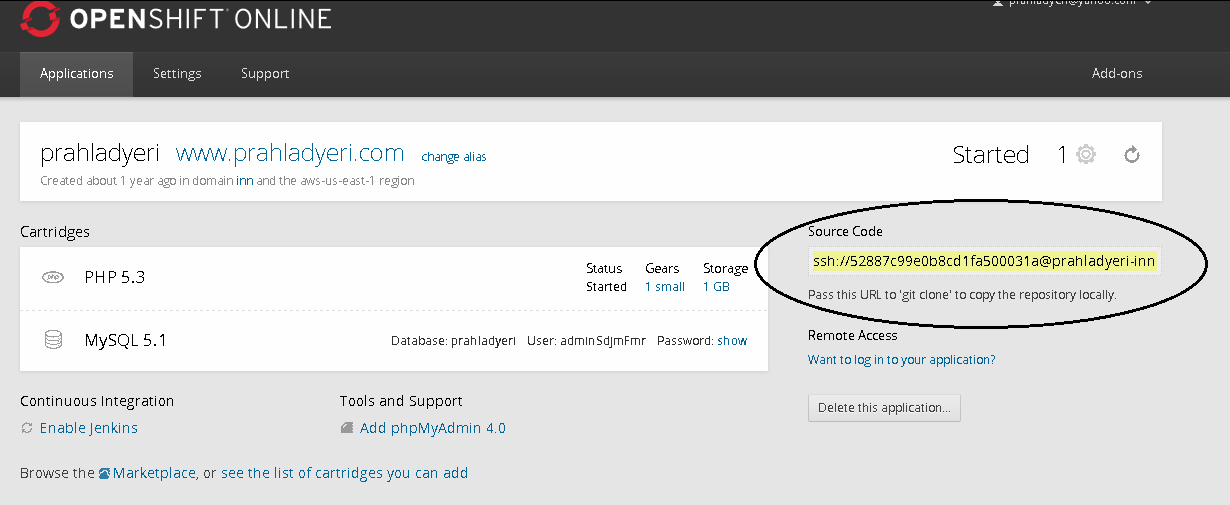
Once you create a python app, Openshift will provide you a git repository url as follows:

Now open your command line and pull this starter repo to your local machine:
git clone <YOUR_SOURCE_URL> myFlaskApp
Now, the remote repository will be cloned in the myFlaskApp folder. Browse it to see the scaffolding.
Add your flask app
The scaffolding structure will be as follows:
wsgi.py
setup.py
.openshift/..
.settings/..
wsgi/..         => your python source files go here.
wsgi/static..   => your static folders viz css, img, fonts, et al. go here.
If the wsgi/ folder doesn’t exist, you’ll have to create it. Just modify the setup.py and add Flask and SQLAlchemy as your app dependencies along with your app name. This tells openshift to make sure that dependency packages are available whenever you push any code changes.
from setuptools import setup

setup(name='myFlaskApp',
	  version='1.0',
	  description='myFlaskApp',
	  author='Prahlad Yeri',
	  author_email='prahladyeri@yahoo.com',
	  url='http://www.python.org/sigs/distutils-sig/',
	  install_requires=['Flask==0.10.1','SQLAlchemy==0.9.8'],
	 )
Now, create a text file named application in the wsgi/ folder with the following contents:
#!/usr/bin/python
import os

virtenv = os.environ['OPENSHIFT_PYTHON_DIR'] + '/virtenv/'
os.environ['PYTHON_EGG_CACHE'] = os.path.join(virtenv, 'lib/python2.7/site-packages')
virtualenv = os.path.join(virtenv, 'bin/activate_this.py')
try:
	execfile(virtualenv, dict(__file__=virtualenv))
except IOError:
	pass

from myFlaskApp import app as application
This is a configuration file that tells openshift where your Flask app script resides. Now create a python file called myFlaskApp.py, this will be your HelloWorld script:
import flask
from flask import Flask
from flask import request

app = Flask(__name__)

@app.route("/")
def home():
	return "Hello World"

if __name__ == "__main__":
	app.run(debug=True)
The last part of the code (app.run) is there so that you may test the Flask app by running this script on your local machine before pushing these changes.
Push your changes
All that is left to be done now is committing your changes and pushing them to openshift:
git add .
git commit -m "Initial commit for myFlaskApp"
git push origin master
Voila! You are done
Wasn’t it almost as easy as deploying a php script on your web host? If everything goes right, your Flask app will be hosted on http://myFlaskApp-mydomain.rhcloud.com/. Visit your app link and check it out.
Few important things
- In case you aren’t familiar about how git over ssl works, the remote machine authenticates your machine using an SSL public key you have already provided them. So if this is your fist time, you’ll have to generate a private-public key pair (using ssh in linux or putty on windows). After that, you’ll have to update your public key to Openshift, so they can authenticate your machine. You can add it using the Settings menu on the Openshift portal.
-
Its very important that all your static files reside in wsgi/static folder and that folder only. Openshift uses that path by default. But in case you are really stuck with using
/cssand/jsin your existing app, as a solution you can clear thestatic_url_pathin your flask app as follows:app = Flask(__name__, static_url_path='', static_folder='static')
Refer to this Openshift tutorial for more details.
-
Make the most of SSH. Some times, you may want to connect with the remote server using secured shell (ssh/putty) for troubleshooting, viewing logs, etc. Your SSH url is included in your git source url. So, if your git url is of the form:
ssh://500XXXXXXXXXXXX01061a@prahladyeri-inn.rhcloud.com/~/git/prahladyeri.git/
Just remove the ssh:// from the beginning and the other things after the domain, so the SSH host url becomes:
500XXXXXXXXXXXX01061a@prahladyeri-inn.rhcloud.com
References: