How to start Android App Development
One of the most frequently asked questions on almost any social networking sites these days is how do I start android app programming? Indeed, it is as if Android Development has become some abstract and obscure layer of programming model that only few Illuminati sort of individuals seem accomplished at.
There is no doubt that the process of compiling an android app from source-code to the actual bytecode that runs on your smartphone is a bit more complex than compiling your normal C or Java program. And it seems even more complex than it deserves to be because of some drastic changes Google has introduced with Android Platform, such as:
- Android is a whole new Operating System which comes with its own concepts.
- Android has a completely new SDK which has both similarities and differences with the Standard
Java SE. - Android introduces new programming models for smartphone interfaces like
Activity,Intent, etc. - Android introduces a completely new way of building GUI interfaces using an XML dialect.
- Android makes frequent changes to its IDE and keeps switching its recommended IDE.
The Android world is always in a flux, though it has been stabilizing a bit since the last year. Eclipse plus the ADT Plugin was the original recommended IDE and still used by many, but a few years back that changed and now Android’s official development way is the Android Studio which is nothing but a decorated version of Intellij IDEA.
In any case, it is important to note that learning Android Development is a full-time job, at least until you grasp the basics. Think of it as just another branch of development, just like you have the traditional Desktop Programming using Visual Studio or .NET, Web Programming using PHP/Python/HTML/CSS, this is the arena of Mobile Apps Development or specifically, Android Development.
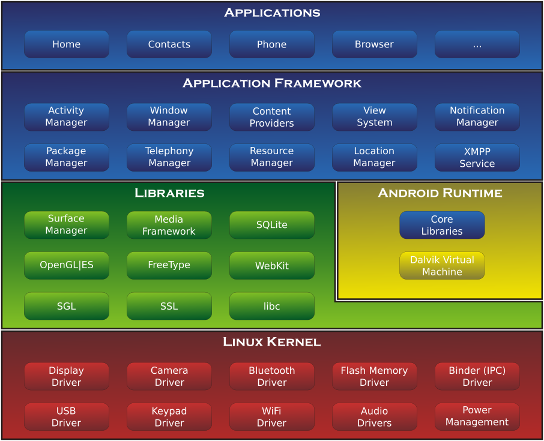
But that doesn’t mean you need to know the intricacies of how telephony works or how does your app interact with SIM-cards or the Contacts on your SDCard. Thankfully, Android has already done that low level job for you. Android is based on Linux kernel which is very powerful and secure when it comes to controlling a handheld device. On top of Linux, Android ships with its own libraries that interact with the kernel, along with the Dalvik runtime. Dalvik is nothing but a miniaturized version of your Java Runtime Engine (affectionately called JRE). The thing about Dalvik is that it is much less resource intensive compared to JRE since it is specifically designed for smart devices. Here is the entire android stack or architecture that you should keep referring to througout your app development process:

^Courtesy:\ “Android-System-Architecture”\ by\ Smieh\ -\ Anatomy\ Physiology\ of\ an\ Android.^
The top layer of the stack consists of Applications or apps that we generally use like Contacts, Browser, Home (the Launcher screen that first comes when you start your device), Phone (the dialler) are all apps.
The second layer consists of Frameworks - i.e stuff that the apps are made of. As you will soon learn, there are things like Activities, Views, Content Providers, etc. which are going to be the building blocks of our apps. The Android OS manages these blocks as soon as the user starts our app and starts using it.
Pre-requisites
There are a few things that you already must know in order to start android-programming, the most important being Core Java, also known as Java SE for Standard Edition (not EE or Enterprise Edition). If you don’t know it, then go back to school (or a self-learning website) and learn that first. Java programming introduces enough nuances and complexities of its own, so you will likely get overwhelmed by both Java and Android if you try to learn them at the same time. Recommended Java tutorial site is the one found at Oracle website.
The other thing you should know about is how to use Eclipse or IntelliJ IDEs as you will have to use either one of them to start Android Programming. However, this isn’t a hard requirement like that of Java. IDE is something that you can get used to after using it for a while. It might take some google-searches or errands at StackOverflow at first, but once you get used to it for sometime, you can figure out most things pretty easily.
Thirdly, it is not mandatory but helpful to know some good design principles. The way you style your widgets like TextViews, Labels, EditTexts, etc. very much determines whether people will like your app or not. There is also the thing that when you launch you app in the market, people will judge your app by its cover or front-screen and your download count will likely depend on that. Of course, you can hire a graphic designer for this or if you are a DIY guy like me, learn a professional Image Editing software like GIMP (on Linux) or Adobe Photoshop (on Windows).
Install the Java JDK
Now that you have had your breakfast and kept aside all your distractions to focus on the Android Mission, the first thing to do is install the Java JDK software which is required in order to write and compile Android Apps. Again, head over to Oracle website where you can find the latest download for Java SE. Choose your OS and preferred version. Don’t install Netbeans unless you need it for any other purpose, we will be using either Eclipse or Android Studio for app development.
Install the Android SDK, SDK Tools and Platform Tools
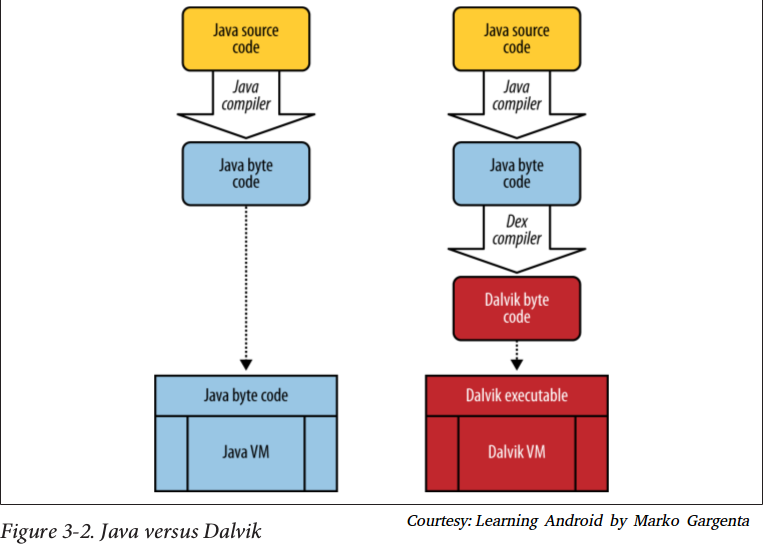
Head over to Android Developer site and download the Android SDK. Now, if you want to use Android Studio (or you are a big fan of the grade build system which is default there), download that IDE which includes the entire bundle. Otherwise, head downwards to find an option called “SDK only” to download the minimal commandline version or if you want to use Eclipse with ADT plugin. The thing here is that you need at least one IDE to develop otherwise it gets pretty complex to hand-code the xml layouts, double-compile your code, first to Java bytecode (.class) and then to Dalvik bytecode (.dex) and finally zipping them into APK (the JAR equivalent), that you are better off delegating these low details to an IDE.
Again, its important to know, why double compilation is required to build Android apps. You see, your code is first compiled to Java bytecode and then, Dalvik compiler takes that output and compiles it to dex or Dalvik bytecode (why that happens is an interesting topic for my another blog post!). Here is how this happens:

Build that Hello World App
Head over to the Configuration Section first to ensure that you’ve setup your IDE properly. Then, the Workflow section is your Bible (or Geeta or Qoran or whatever thrills you). Read it, re-read it, bookmark it, keep referring to it until you are proficient in building and running apps. Needless to say, if you face any issues, there is always Google and StackOverflow which should answer all your queries.
In my next post, I will be covering about android features and a doing some basic things like layout design, interaction with sqlite databases, etc. All the best!
References:
Android Workflow section
Android Configuration Section
Android SDK Downloads
The Android Operating System
Latest download for Java SE