How to create a Server-less Google Drive client using only HTML and JavaScript
A few days ago, I had to work on a project of this kind and the information and documentation available on this topic was quite bewildering. As a result, I decided to write this article in order to make everything available at one place.
Almost everyone knows about the Google API Python Client(and similar others in Java, PHP, etc.) which can be accessed from the server, but few are aware that Google even supports a totally server-less implementation of a client using only client-side technology (HTML/JavaScript). The only caveat here is that your app won’t get a permanent access token like the server side apps do, but instead, has a temporary access until your web page isn’t closed. Here is how to go about doing it:
Step-1: Register your App by visiting the Google Cloud Console:
As usual, visit the Google Cloud Consoleand register your app first, enable the Google Drive API by visiting “APIs & Services”=>“Dashboard”, then click on “Credentials” to create an API Key, an OAuth credential and setup the authentication screen for your user. While setting credentials, remember to add your app’s URL in authorized Redirect-URIs section. If you have multiple URLs for your app (like localhost for testing, www.YourSite.com for production, etc., then add them all to the list):
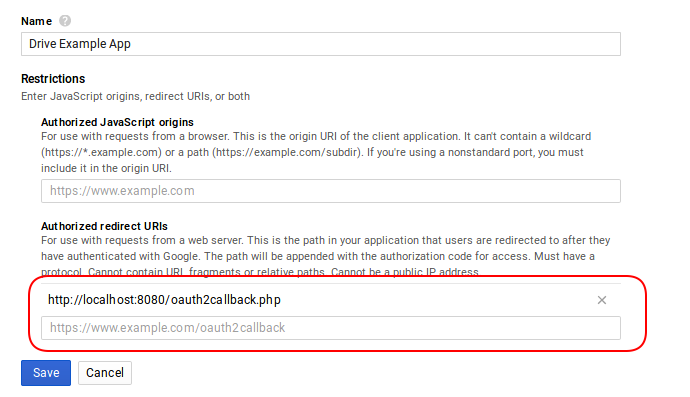
Credentials Configuration: Redirect URIs
Step-2: Setup the OAuth consent screen.
This is what your user will see when they visit your app and it redirects them to Google for getting permissions for Drive access. Click on the “OAuth consent screen” tab and configure it with your app’s name, logo, etc.
Step-3: Add script references.
After you create the credentials and get your ClientID, API Key and secret key (not useful for our app, really), the next step is to start building the app. I usually prefer to keep the JavaScript logic in a separate file such as app.js instead of keeping it in the main index.html. Just add a script tag in your main index.html and add a reference to this app.js in which you’ll write the Google Drive logic:
<script src="/static/app.js"></script>
I’ve kept the app.js in a sub-folder named /static, if yours is different, then adjust the path accordingly. You’ll also need to add a reference to Google authentication library in order to perform the OAuth authentication:
<script async defer src="https://apis.google.com/js/api.js"
 onload="this.onload=function(){};handleClientLoad()"
 onreadystatechange="if (this.readyState === 'complete') this.onload()"></script>
Finally, also add a reference to jQuery if you want to use it. In most apps, its usually a must!
<script src="https://ajax.googleapis.com/ajax/libs/jquery/1.11.3/jquery.min.js"></script>
Step-4: Build the app.
Now, in your app.js, first add global variables that you’ll need throughout your app:
var GoogleAuth;
var SCOPE = 'https://www.googleapis.com/auth/drive'; //.metadata.readonly
SCOPE += " https://www.googleapis.com/auth/drive.install";
SCOPE += " https://www.googleapis.com/auth/drive.file";

var files = []; //array to store the list of files in user's drive.
Add the scopes as per your requirements, I had included auth/drive.install and auth/drive.file only because I had to provide an “open with this app” feature in the user’s own google drive interface so that they may visit our app and run their files through it, and thus use it as a “file opener”. If you don’t need to provide such extended features and just want full access to the user’s files, then the first one (auth/drive) is sufficient.
After that, write the entry point for our app in app.js. As per the script attribute, you’ll be redirected here by the Google authentication library:
/**
* This is the entry-point that gapi calls.
*
* */
function handleClientLoad() {
 // Load the API's client and auth2 modules.
 // Call the initClient function after the modules load.
 gapi.load('client:auth2', initClient);
}
gapi.load() loads the auth library and prepares your app for authentication, then signals the control to initClient() function where you’ll perform the actual authentication like this:
 /**
 * starts the client authorization, most useful for debugging.
 *
 * */
function initClient() {
    // Retrieve the discovery document for version 3 of Google Drive API.
    // In practice, your app can retrieve one or more discovery documents.
    var discoveryUrl = 'https://www.googleapis.com/discovery/v1/apis/drive/v3/rest';

    // Initialize the gapi.client object, which app uses to make API requests.
    // Get API key and client ID from API Console.
    // 'scope' field specifies space-delimited list of access scopes.
    gapi.client.init({
        apiKey: 'xxxxxxxxxxxxxxxxxxxxxxxxxxxxxxxxxxxxxxxxxxx',
        discoveryDocs: [discoveryUrl],
        clientId: 'yyyyyyyyyy-yyyyyyyyyyyyyy.apps.googleusercontent.com',
        scope: SCOPE
    }).then(function () {
      console.log("init happened successfully.");
      GoogleAuth = gapi.auth2.getAuthInstance();

      console.log("now binding updateSigninStatus");
      GoogleAuth.isSignedIn.listen(updateSigninStatus); // Listen for sign-in state changes.

      // Listen for sign-in state changes.
      console.log("now calling updateSigninStatus");
      updateSigninStatus(GoogleAuth.isSignedIn.get());

      // Handle initial sign-in state. (Determine if user is already signed in.)
      //var user = GoogleAuth.currentUser.get();

      // Call handleAuthClick function when user clicks on
      //      "Sign In/Authorize" button.
      $('#sign-in-or-out-button').click(function() {
        handleAuthClick();
      });
      $('#revoke-access-button').click(function() {
        revokeAccess();
      });

    }, function(error){
        console.log("ERROR in gapi.init:", error);
    });
}
(Remember to replace the long string of “xxxxxx…” with your own API Key, and the long string of “yyyyyy….” with your own Client ID)
gapi.client.init() is an important function which does all the hard work of checking whether a user is authenticated, and if not, then redirect them to Google’s servers, perform the authentication, and if successful, redirect them back to your server and inside the .then() block in which you’ll handle your applications logic (like displaying the logged-in user’s name which you get using GoogleAuth.currentUser.get(), update the logged-in status (toggle sign-in and sign-out buttons accordingly), etc:
gapi.client is your global variable that could be used for doing all kinds of stuff. For example, this is how you can list the files available in the Google Drive’s root folder of the user as links in your document:
   gapi.client.drive.files.get({
        fileId: id,
        fields: 'name,webContentLink'
    }).then(function(success) {
        var webContentLink = success.result.webContentLink;
        var fileName = success.result.name;
        console.log("SUCCESS! name is: ", webContentLink);
        console.log("SUCCESS! webContentLink is: ", webContentLink);
        $source = $("<a href='" + webContentLink + "' >" + fileName + "<a>");
        $('body').append($source);
    }, function(fail){
        console.log(fail);
        console.log('Error '+ fail.result.error.message);
    });
The name field represents the file name and webContentLink is the actual link to the file in the user’s drive, you can use it however in your app once you get it (like download it using the AJAX jquery.get() method, etc.).