Linux DIY: Creating a multiboot USB drive with ISO images of multiple distros
Though I’m not a distro-hopper exactly, I keep trying live versions of popular linux distros like debian and ubuntu every now and then, and while I generally use the “dd” command which works right out of the box, today I thought that instead of burning a new ISO image each time, why not create a single 16GB USB stick which can boot multiple distro images!
dd if=xubuntu-18.04.1-desktop-amd64.iso of=/dev/sdb bs=1M
This simple dd command does the job, but you are left with a single ISO image occupying the entire disk space which is an inefficiency if you have a larger drive that can hold multiple images. So, let’s learn how to reclaim all that space by creating a single USB which can boot multiple ISO images. Though the process is a bit more involved than the dd command, the reward is obviously worth it too.
Step-1: Format your USB drive to FAT32, there should be a single partition on the drive with boot flag enabled. - Also, label the drive as MULTIBOOT or something for recognizing it easier. Though the linked article below uses the fdisk/mkfs.vfat commands, you can even use graphical tools like gparted to make this process simpler.
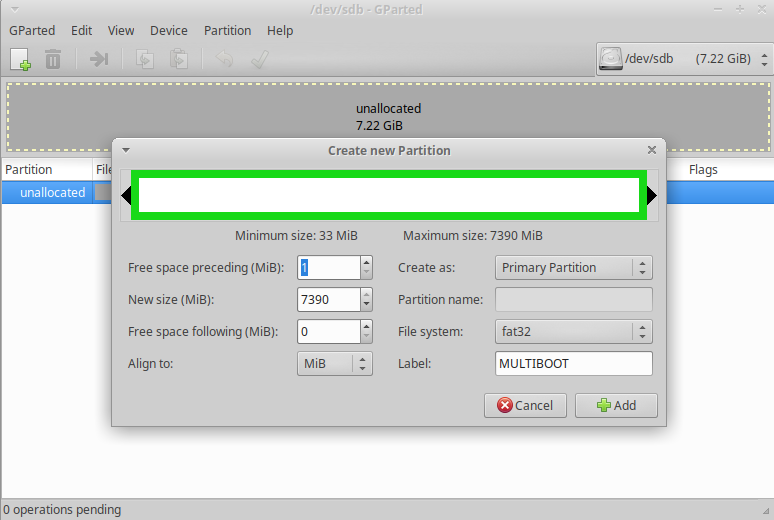 {.alignnone .size-full .wp-image-1020 width=”774” height=”520”}
Step-2: Install grub2 on the newly formatted drive, create a boilerplate grub.cfg file:
- Close the gparted window if its open, otherwise the drive won’t be mounted.
- Type
sudo grub-install --force --no-floppy --boot-directory=/media/prahlad/MULTIBOOT/boot /dev/sdx(replacing path with yours, x with your actual USB device) - Type
cd /media/prahlad/MULTIBOOT/boot/grub(or whatever your path is) - Type
wget http://pendrivelinux.com/downloads/multibootlinux/grub.cfg(to get the grub.cfg file)
Step-3: Copy whatever ISOs you want into the root folder of your drive. For the purposes of this example, let’s consider latest LTS releases of Ubuntu and Xubuntu (swap with any other flavors or debian too if you prefer):
cp ubuntu-18.04.1-desktop-amd64.iso /media/prahlad/MULTIBOOT/
cp xubuntu-18.04.1-desktop-amd64.iso /media/prahlad/MULTIBOOT/
Step-4: Edit the grub.cfg you just downloaded, and configure entries for your ISOs accordingly. Its important that you do this carefully:
# This grub.cfg file was created by Lance http://www.pendrivelinux.com
# Suggested Entries and the suggestor, if available, will also be noted.

set timeout=10
set default=0

menuentry "Ubuntu Desktop ISO" {
 loopback loop /ubuntu-18.04.1-desktop-amd64.iso
 linux (loop)/casper/vmlinuz boot=casper iso-scan/filename=/ubuntu-18.04.1-desktop-amd64.iso noeject noprompt splash --
 initrd (loop)/casper/initrd.lz
}

menuentry "Xubuntu Desktop ISO" {
 loopback loop /xubuntu-18.04.1-desktop-amd64.iso
 linux (loop)/casper/vmlinuz boot=casper iso-scan/filename=/xubuntu-18.04.1-desktop-amd64.iso noeject noprompt splash --
 initrd (loop)/casper/initrd
}
As you can see, I’ve changed only the menu entries to keep things simple. The arguments are also self apparent. For instance, loopback and loop attributes are used because we aren’t booting directly from the USB, but mounting the virtual loop device (ISO file) instead.
However, note that there could be subtle differences between distros, xubuntu uses /casper/initrd instead of /casper/initrd.lz, for instance. To know the right entry for your own distro, compare the “/boot/grub/grub.cfg” file of your distro ISO to get a hint about what menu entry to add. If your ISO isn’t one of the ‘buntus or a debian, then it might get trickier.
Step-5: Boot from your USB drive and ensure that it works.
Make sure that you boot from your newly created USB drive, not from the hard drive as usual. If everything goes right, you should be able to see a grub boot screen with the two menus for Ubuntu and Xubuntu.
Once this process is successful, adding new ISOs to your drive is only too easy. Just copy the brand new ISO to your drive’s root directory and just add the necessary entry in /boot/grub/grub.cfg, that’s it!
Finally, you’ll have to enable legacy boot option if not already done in your bios settings, this process won’t work with EFI/UEFI systems since the drive doesn’t have an EFI partition. I might do another post about creating a similar drive for EFI/UEFI setups in future, until then you can refer to this reddit post by /u/need2burn.
Best of luck!
Reference:
http://www.pendrivelinux.com/boot-multiple-iso-from-usb-via-grub2-using-linux/